The EverythingSearchClient has now the capability to return the search result sorted. The new release v0.4 is available on Github and as NuGet package.

The addition was sort of straight forward, as the functionality to return the search results sorted is implemented in Everything itself. I just ported the respective configuration flags into my CSharp client library and extended the code which creates the interprocess communication query (version 2).

With this, I currently have no further features planned for my EverythingSearchClient. I am already using it in a couple of my own projects. If you use it as well, I would be happy to hear it. :-)

I added another new tool to my Tiny Tools Collection: ToggleDisplay

Code: https://github.com/sgrottel/tiny-tools-collection/tree/main/ToggleDisplay
Released Binary: https://github.com/sgrottel/tiny-tools-collection/releases/tag/ToggleDisplay-v1.0

It allows you to enable, disable, and toggle a display.

Why? My computer is connected to 2-3 displays. Two computer monitors on my desk for work. And a TV on the other side of the room, e.g. to play games from my computer or to watch video files in style.

Often enough I boot the computer, and then my mouse disappears from the desktop, because I forgot the TV was configured “on” before, and the mouse moved beyond the desktop monitors. Annoying. The built-in feature “Windows-Key + P” is understandably limited to two monitors. So, I always had to press “Windows + P”, then “Further Settings”, wait for the dialog to appear, fiddle around, press apply, … you get my point.

So, I researched the net a bit on how to programmatically enable or disable a display. And there are several free tools to do that. I tried two, and both did not work. Then there is a hack with using a Windows 10 executable on Windows 11. Yeah, no. Ok. Search on!

It turns out, there is an easy API for that: ChangeDisplaySettingsEx. Some experimental code later I was able to deactivate the display, but not to (re-)activate it. Not good enough. Search on!

Some search later, turns out there is a second API, not as simple and with next to no useful documentation: SetDisplayConfig. This one seems to be the API the windows built in display configuration dialog uses. But … how. I found code by “PuFF1k” on StackOverflow (https://stackoverflow.com/a/62038912/552373) who reverse engineered the API calls of the windows dialog. I tried his code, and it works. Nice! Thank you, PuFF1k!

The core of the trick is to not provide any modeInfo data to SetDisplayConfig, and to set all sourceInfo.modeInfoIdx and targetInfo.modeInfoIdx of all paths to DISPLAYCONFIG_PATH_MODE_IDX_INVALID.

Some refactoring and some cleanup later, I have ToggleDisplay, ready to be shared with the world.

By the way, I now also included source code of some of my older tools in this Tiny Tools Collection repository:

I uses that opportunity to also update these projects to recent DotNet runtimes. I did not set up any automated build pipeline or releases. Maybe some other time.

Some time ago I started a section on my website here about tools I use and like. I started that series writing about the Everything search tool by Voidtools, which is lightning fast and awesome.

Since then I integrate Everything into several internal tools of mine. Most of the time, I used the Everything command line client and parsed its output. However, I had some trouble with Unicode file names. Then I looked at Dotnet library solutions, namely Everything .Net Client and EverythingNet. Both are basically only P/Invoke wrappers around the Everything SDK, which itself is a wrapper around Interprocess Calls (IPC) to the Everything service. And so, since I know my stuff around low level techniques like Windows Message based IPC, and since I don’t like wrappers of wrappers of functions, I decided to write a library of my own: Everything Search Client

It is a .Net 6.0 library, completely written in CSharp, with some P/Invoke calls to native Windows functions of the Operating System, and directly talking to the Everything service.

The code is available on Github and the ready-to-use nuget package is on Nuget.org.

If you find it useful and use it in a tool of your own, I would love to hear about it: Used By, How to Contribute

I present a new little tool with very specific purpose: OpenHere

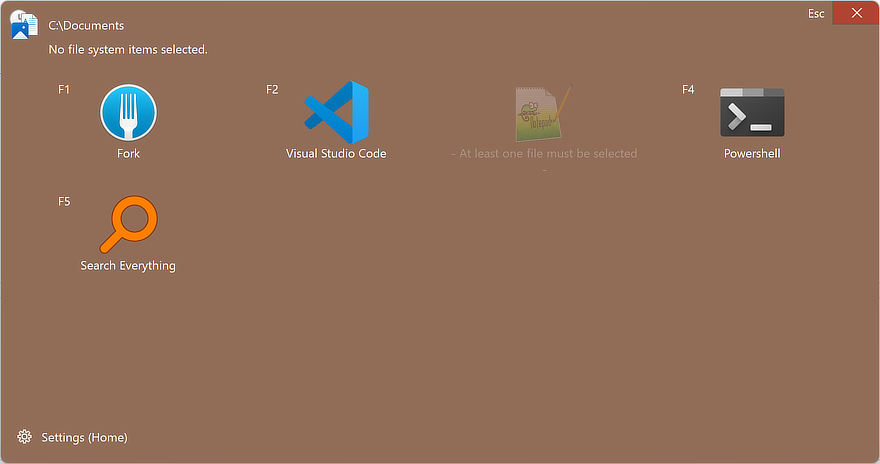
It detects running instances of the Windows File Explorer. From the top-most instance it, fetches the opened path, and any selected files. You can use the command line application to retrieve this information. Or you can use the GUI application, displaying a tool window to select and open one of up to twelve configured tools.

My keyboard has several freely assignable macro keys, which I did not use for years. Simply, because I had no idea what to do with them. Then, Windows 11 came along. One of the maybe most criticized features is the new context menu in the file explorer, hiding away most functions you might or might not want to call on files and folders. That’s when I thought, it would be nice to use the macro keys to trigger something on the selected file, like opening it in Notepad++ or open the whole folder in Visual Studio Code or in Fork or something like that. And that’s what I wrote OpenHere for.

I learned quite a bit about the low level icon handling and loading of large icons, and I got to get more experience working with WPF.

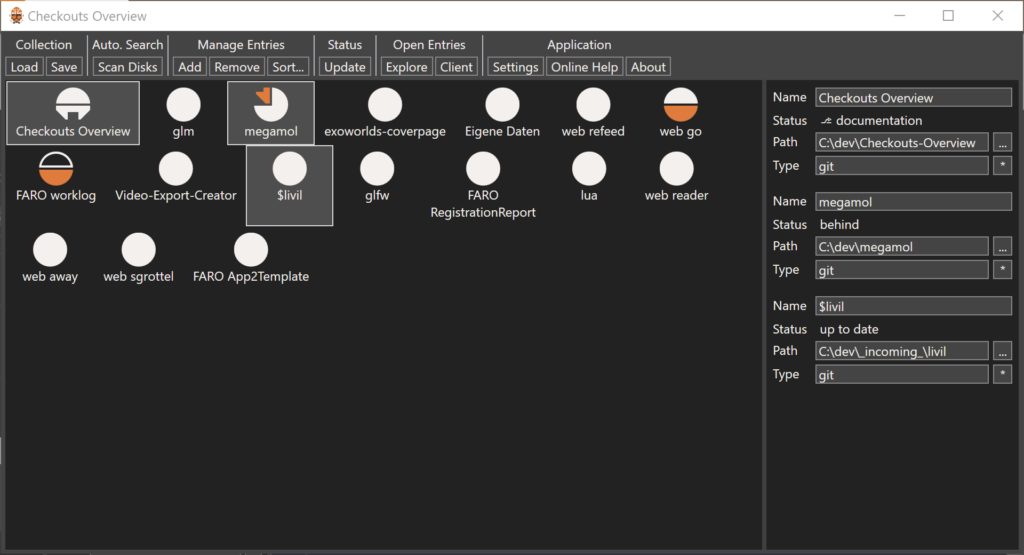
Today I release a new version of my Checkouts Overview tool.

Version 1.1 is a feature release, improving the scanning of your hard disks searching for repository checkouts, and adding the ability to perform a git fetch while updating the entry status.

Some minor improvements to the UI also provide a more consistent look and feel.

Grab the release from Github: Release Feature Release v1.1 – Better Disk Scanning and Git Fetch · sgrottel/checkouts-overview (github.com)

I got a new tool in my tool box: KeePass HotKey is a wrapper utility to open a KeePass DB or trigger the Auto-Type Feature.

This utility is very specific to my use case:

  • I want to trigger one action from a dedicated hardware key on my keyboard
  • This action should either open a specific KeePass data base file, configured by the user, or
  • Trigger the “auto-type selected” feature of KeePass, if a KeePass instance is open, running, and has a selected entry.

You can find sourc code and released binaries at Github.

Today I present you the Checkouts Overview tool.

https://github.com/sgrottel/checkouts-overview
https://go.grottel.net/checkouts-overview

What? Why? Because this little tool helps me.

In my private setup, I have a lot of smaller repos checked out, and work on them only occasionally. In addition, I got several repos to collect the history of some text documents. Some of those repos are synced against servers which are only occasionally online, partially for power saving or partially due to VPN and network connectivity stuff. As a result, I often keep losing track of the sync states of all the different repos.

Is everything checked in? — most times, yes. If the change was complete.

Is everything pushed? — maybe.

Am I on branches? — no idea.

You might not need this app, if you have a better structured work process with your stuff than I do. I don’t, so I need help by a tool, by this tool.

If you are interested, you find more info in the app’s github repository.

Note: and as for the app’s icon, it’s about (repository) clones, right.

Redate is another tool in my growing toolbox. The idea is simple: many applications generate files, write files, update files, with exactly the same content as before. The file write date, of course, is updated. The content stays the same. Other tools, then again, us the file write date as indicate if the files have been changed. Which makes sense, right.

So, this little tool, “Redate,” stores the MD5 hashes of the files, and their original write dates. When the tool is then re-run on that list of files, it restores the original write dates for all files with unchanged MD5s. And, that’s it.

I use it for Vue.js projects, to keep the write dates of files in the dist folders. Then, a simple FTP-sync only needs to update changed files for the final deployment. This helps for projects with many unchanged assets.

You can grab source and binary releases from github.

This article details the work with inter-plugin dependencies in MegaMol™. The primary scenario is to have one (or many) plugins use Call classes exported by another plugin (and not the MegaMol™ core).

Actually, nothing was changed in the MegaMol™ core. Inter-plugin dependencies already worked, to some extent. The limits, and especially the behavior in error cases are described below.

Test Project: interplugin_test

The following project shows two plugins:

https://bitbucket.org/MegaMolDev/megamol_interplugin_test

Plugin A exports 2 modules and 1 call.

Plugin B exports one module using the call exported by modul A.

Exporting Call Header

Usually, modules and calls are only exported via their meta data description classes as part of the implementation in “plugin_instance”. This meta data is sufficient for the MegaMol™ core to instantiate the module at runtime. However, these classes are normally not exported by the plugins.

If you want to use a class, a Call, in other plugins at compile time, you have to export the type. You need to place the corresponding header file in the public export folder. For a typical case, have a look at the demo project: “./a/include/interplugin_test_a/IplgDemoCall.h” I also recommend to add the header files to the filter “Public Header Files” in the Visual Studio Solution Explorer.

Additionally, you need to export the class using the corresponding API macro: e.g. “INTERPLUGIN_TEST_A_API”, which is defined in the plugin’s primary header file, e.g. “interplugin_test_a/interplugin_test_a.h”

Of course, you still need to export the meta data description for the call itself in the “plugin_instance” definition (cf. “interplugin_test_a.cpp” line 51).

Using Call in another Plugin

Now, to use the Call in another Plugin, that one basically needs to link against the exporting Plugin. Following the demo project, the exporting plugin is called A and the using plugin in named B.

First A is a library and a normal development dependency for B. For Visual Studio, I recommend using the “configure.win.pl” and “ExtLibs.props.input” similar to any other 3rd-party library. In the demo project, the access to the subdirectory of A is hard coded in the “ExtLibs.props.input”. Then, you can use this user macro in the project settings:

  • C/C++ > General > Additional Include Directories
    • E.g. $(PluginAPath)include\
  • Linker > General > Additional Library Directories
    • E.g. $(PluginAPath)lib\$(PlatformName)\$(Configuration)\
  • Linker > Input > Additional Dependencies
    • E.g. interplugin_test_a.lib

As you see, the linker only uses the built input library of the plugin, not the compiled plugin A itself.

Now you can find the public header file of the call exported by the plugin, cf. “./b/src/IplgValueInvertB.cpp” line 3. Plugin B uses this class like any class exported from the core. Nothing special is required.

For Linux you could introduce similar settings in the “CMakeLists.txt” file. I did not.

Since I install everything of MegaMol™ into a local user directory (using the install prefix settings in the build scripts) all parts of MegaMol™ are available at the same location. This includes the core, which the “CMakeLists.txt” file already searches for and Plugin A, which is thus accidentally found too. So the public include files, which were copied when Plugin A was “installed” are already available. Linux does not require shared objects to link against their dependencies. The runtime loader is expected to resolve all issues. Thus, for building on Linux no additional settings are required.

If you want to be able to work with plugins not locally installed, you should write a corresponding find script for the base plugin A and use “find_package” in the “CMakeLists.txt” of plugin B. For now, I don’t care.

Configuring MegaMol™ with both Plugins

Just add both plugins, as usual, to the MegaMol™ configuration file. Either explicitly (recommended) or using file globing. You should keep the dependencies in mind. So you should load plugin A before you load plugin B. But technically, it does not matter.

Both plugins, all plugins, are basically Dlls. So if you load plugin B first, the Dll is loaded with all its dependencies. These include the Dll plugin A. So plugin A is in memory the, but the meta data is not known to the core yet. If then the command for loading plugin A is executed, the OS runtime is asked to load the Dll plugin A. Since that Dll is already in memory, the load succeeds and the plugins meta data is received and added to the core factory constructs.

Beware of Cyclic Dependencies

Cyclic Dependencies should be avoided, as always. In theory, they could work, like Plugin A uses a class from Plugin B and the other way round at the same time. However, if you are going towards such a scenario, I strongly recommend to create a third Plugin holding the shared classes, e.g. Calls.

Runtime Behavior if Dependent Plugin is not found

The OS runtime errors when a Dll (Plugin) cannot be loaded are rather useless. (I am working on something better here, but it is not as easy as one would think.) Usually, it only tells you that the Dll could not be loaded. So keep in mind, if you developing your plugins that other plugins you depend on, not only need to be available at compile time, but also need to be installed in the same bin directory for runtime access.

Version Number Tests

All plugins check their version numbers of Core and Vislib with the loading core. This is to avoid inconstancies at runtime. Imagine you build the Core, then work on your Plugin. In this work you stumble upon a bug in the Vislib and fix that. Then your core and your plugin use different Vislibs and only this very version check tells you that this is a bad idea.

Now, use that scenario and replace Vislib with plugin A. Welcome to hell. There currently is not version check implemented for cross-plugin dependencies. (Most likely, there will be no such check before the infamous coming “Call Interface Redesign”.) You need to be careful!

Simple computer graphics demos are often developed as console applications. Having the console window is simply convenient for debug output. However, if we then show these demos on our stereo powerwall, the console window flashing on program start is massively disturbing. That is why I take some time and wrote a little tool. It starts the console application, hides the console window, but captures the output. This way, we can still check what happened if something does not work.

I present the HiddenConsole:

HiddenConsole.zipHiddenConsole.zip Application starter hiding the console window
[55.3 KB; MD5: 848cbd8aa901fe38be8179d65b6d2162; More Info]

And, because I can, the source is freely available:

https://bitbucket.org/sgrottel-uni/hiddenconsole