It allows you to enable, disable, and toggle a display.
Why? My computer is connected to 2-3 displays. Two computer monitors on my desk for work. And a TV on the other side of the room, e.g. to play games from my computer or to watch video files in style.
Often enough I boot the computer, and then my mouse disappears from the desktop, because I forgot the TV was configured “on” before, and the mouse moved beyond the desktop monitors. Annoying. The built-in feature “Windows-Key + P” is understandably limited to two monitors. So, I always had to press “Windows + P”, then “Further Settings”, wait for the dialog to appear, fiddle around, press apply, … you get my point.
So, I researched the net a bit on how to programmatically enable or disable a display. And there are several free tools to do that. I tried two, and both did not work. Then there is a hack with using a Windows 10 executable on Windows 11. Yeah, no. Ok. Search on!
It turns out, there is an easy API for that: ChangeDisplaySettingsEx. Some experimental code later I was able to deactivate the display, but not to (re-)activate it. Not good enough. Search on!
Some search later, turns out there is a second API, not as simple and with next to no useful documentation: SetDisplayConfig. This one seems to be the API the windows built in display configuration dialog uses. But … how. I found code by “PuFF1k” on StackOverflow (https://stackoverflow.com/a/62038912/552373) who reverse engineered the API calls of the windows dialog. I tried his code, and it works. Nice! Thank you, PuFF1k!
The core of the trick is to not provide any modeInfo data to SetDisplayConfig, and to set all sourceInfo.modeInfoIdx and targetInfo.modeInfoIdx of all paths to DISPLAYCONFIG_PATH_MODE_IDX_INVALID.
Some refactoring and some cleanup later, I have ToggleDisplay, ready to be shared with the world.
I uses that opportunity to also update these projects to recent DotNet runtimes. I did not set up any automated build pipeline or releases. Maybe some other time.
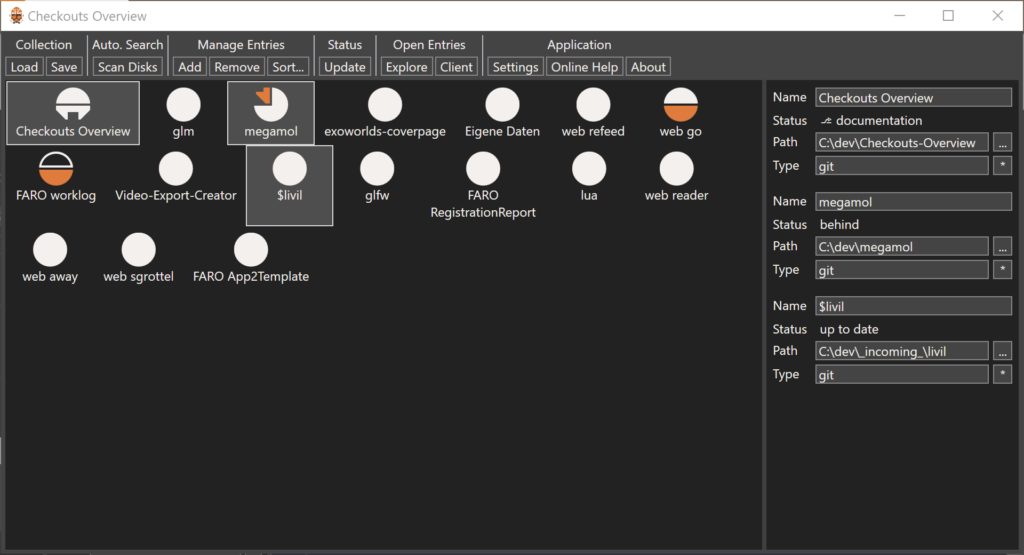
Version 1.1 is a feature release, improving the scanning of your hard disks searching for repository checkouts, and adding the ability to perform a git fetch while updating the entry status.
Some minor improvements to the UI also provide a more consistent look and feel.
In my private setup, I have a lot of smaller repos checked out, and work on them only occasionally. In addition, I got several repos to collect the history of some text documents. Some of those repos are synced against servers which are only occasionally online, partially for power saving or partially due to VPN and network connectivity stuff. As a result, I often keep losing track of the sync states of all the different repos.
Is everything checked in? — most times, yes. If the change was complete.
Is everything pushed? — maybe.
Am I on branches? — no idea.
You might not need this app, if you have a better structured work process with your stuff than I do. I don’t, so I need help by a tool, by this tool.
Redate is another tool in my growing toolbox. The idea is simple: many applications generate files, write files, update files, with exactly the same content as before. The file write date, of course, is updated. The content stays the same. Other tools, then again, us the file write date as indicate if the files have been changed. Which makes sense, right.
So, this little tool, “Redate,” stores the MD5 hashes of the files, and their original write dates. When the tool is then re-run on that list of files, it restores the original write dates for all files with unchanged MD5s. And, that’s it.
I use it for Vue.js projects, to keep the write dates of files in the dist folders. Then, a simple FTP-sync only needs to update changed files for the final deployment. This helps for projects with many unchanged assets.
Yes, I am still using AntTweakBar. As you might know, the development of AntTweakBar is discontinued. At some point in the future, I will switch. Currently, I consider imgui the best successor. But I haven’t had time to look into imgui. So, when I resurrected an old small tool of mine, it still used ATB, and I did not want to recode all of this. But out of “because-I-can,” I decided to update all dependencies to their newest versions. As a result the ATB integration with GLFW 3 did not work any longer. A couple of callback functions where changed between GLFW 2 and GLFW 3. I ended up rewriting my glue code between those two libraries.
Here it is, if any of you ever come across the same issue. First the callbacks:
static void keyCallback(GLFWwindow* window, int key, int scancode, int action, int mods)
{
#ifdef HAS_ANTTWEAK_BAR
  if (action == GLFW_PRESS || action == GLFW_REPEAT)
  {
    int twMod = 0;
    bool ctrl;
    if (mods & GLFW_MOD_SHIFT) twMod |= TW_KMOD_SHIFT;
    if (ctrl = (mods & GLFW_MOD_CONTROL)) twMod |= TW_KMOD_CTRL;
    if (mods & GLFW_MOD_ALT) twMod |= TW_KMOD_ALT;

    int twKey = 0;
    switch (key)
    {
    case GLFW_KEY_BACKSPACE: twKey = TW_KEY_BACKSPACE; break;
    case GLFW_KEY_TAB: twKey = TW_KEY_TAB; break;
    //case GLFW_KEY_???: twKey = TW_KEY_CLEAR; break;
    case GLFW_KEY_ENTER: twKey = TW_KEY_RETURN; break;
    case GLFW_KEY_PAUSE: twKey = TW_KEY_PAUSE; break;
    case GLFW_KEY_ESCAPE: twKey = TW_KEY_ESCAPE; break;
    case GLFW_KEY_SPACE: twKey = TW_KEY_SPACE; break;
    case GLFW_KEY_DELETE: twKey = TW_KEY_DELETE; break;
    case GLFW_KEY_UP: twKey = TW_KEY_UP; break;
    case GLFW_KEY_DOWN: twKey = TW_KEY_DOWN; break;
    case GLFW_KEY_RIGHT: twKey = TW_KEY_RIGHT; break;
    case GLFW_KEY_LEFT: twKey = TW_KEY_LEFT; break;
    case GLFW_KEY_INSERT: twKey = TW_KEY_INSERT; break;
    case GLFW_KEY_HOME: twKey = TW_KEY_HOME; break;
    case GLFW_KEY_END: twKey = TW_KEY_END; break;
    case GLFW_KEY_PAGE_UP: twKey = TW_KEY_PAGE_UP; break;
    case GLFW_KEY_PAGE_DOWN: twKey = TW_KEY_PAGE_DOWN; break;
    case GLFW_KEY_F1: twKey = TW_KEY_F1; break;
    case GLFW_KEY_F2: twKey = TW_KEY_F2; break;
    case GLFW_KEY_F3: twKey = TW_KEY_F3; break;
    case GLFW_KEY_F4: twKey = TW_KEY_F4; break;
    case GLFW_KEY_F5: twKey = TW_KEY_F5; break;
    case GLFW_KEY_F6: twKey = TW_KEY_F6; break;
    case GLFW_KEY_F7: twKey = TW_KEY_F7; break;
    case GLFW_KEY_F8: twKey = TW_KEY_F8; break;
    case GLFW_KEY_F9: twKey = TW_KEY_F9; break;
    case GLFW_KEY_F10: twKey = TW_KEY_F10; break;
    case GLFW_KEY_F11: twKey = TW_KEY_F11; break;
    case GLFW_KEY_F12: twKey = TW_KEY_F12; break;
    case GLFW_KEY_F13: twKey = TW_KEY_F13; break;
    case GLFW_KEY_F14: twKey = TW_KEY_F14; break;
    case GLFW_KEY_F15: twKey = TW_KEY_F15; break;
    }
    if (twKey == 0 && ctrl && key < 128)
    {
      twKey = key;
    }
    if (twKey != 0)
    {
      if (::TwKeyPressed(twKey, twMod)) return;
    }
  }
#endif
}

static void charCallback(GLFWwindow* window, unsigned int key)
{
#ifdef HAS_ANTTWEAK_BAR
  if (::TwKeyPressed(key, 0)) return;
#endif
}

static void mousebuttonCallback(GLFWwindow* window, int button, int action, int mods)
{
#ifdef HAS_ANTTWEAK_BAR
  if (::TwEventMouseButtonGLFW(button, action)) return;
#endif
}

static void mousePosCallback(GLFWwindow* window, double xpos, double ypos)
{
#ifdef HAS_ANTTWEAK_BAR
  if (::TwEventMousePosGLFW((int)xpos, (int)ypos)) return;
#endif
}

static void mouseScrollCallback(GLFWwindow* window, double xoffset, double yoffset)
{
#ifdef HAS_ANTTWEAK_BAR
  static double pos = 0;
  pos += yoffset;
  if (::TwEventMouseWheelGLFW((int)pos)) return;
#endif
}

static void resizeCallback(GLFWwindow* window, int width, int height)
{
#ifdef HAS_ANTTWEAK_BAR
  ::TwWindowSize(width, height);
#endif
}
Of course, you can omit the #ifdefs if you don’t care. Add your own codes to the functions after ATB has been handled.
Then, it’s just your typical initialization of GLFW callbacks:
Now, I am a bit stubborn. I want to use HtmlAgilityPack and I want to have indented, human-readable html files. The magic is within text nodes in the DOM. So, I wrote two utility functions to help me out.
First, to get rid of all unwanted whitespaces. This one might be a bit aggressiv, but it was ok for me:
static private void removeWhitespace(HtmlNode node) {
  foreach (HtmlNode n in node.ChildNodes.ToArray()) {
    if (n.NodeType == HtmlNodeType.Text) {
      if (string.IsNullOrWhiteSpace(n.InnerHtml)) {
        node.RemoveChild(n);
      }
    } else removeWhitespace(n);
  }
}
And, second, to create white spaces for line breaks and indentions:
internal static void beautify(HtmlDocument doc) {
  foreach (var topNode in doc.DocumentNode.ChildNodes.ToArray()) {
    switch (topNode.NodeType) {
      case HtmlNodeType.Comment: {
          HtmlCommentNode cn = (HtmlCommentNode)topNode;
          if (string.IsNullOrEmpty(cn.Comment)) continue;
          if (!cn.Comment.EndsWith("\n")) cn.Comment += "\n";
        } break;
      case HtmlNodeType.Element: {
          beautify(topNode, 0);
          topNode.AppendChild(doc.CreateTextNode("\n"));
          //doc.DocumentNode.InsertAfter(doc.CreateTextNode("\n"), topNode);
        } break;
      case HtmlNodeType.Text:
        break;
      default:
        break;
    }
  }
}

private static bool beautify(HtmlNode node, int level) {
  if (!node.HasChildNodes) return false;

  var children = node.ChildNodes.ToArray();
  bool onlyText = true;
  foreach (var c in children) {
    if (c.NodeType != HtmlNodeType.Text) onlyText = false;
  }
  if (onlyText) return false;

  string nli = "\n" + new string('\t', level);

  foreach (var c in children) {
    node.InsertBefore(node.OwnerDocument.CreateTextNode(nli), c);
    if (c.NodeType == HtmlNodeType.Element) {
      if (c.HasChildNodes) {
        if (beautify(c, level + 1)) {
          c.AppendChild(c.OwnerDocument.CreateTextNode(nli));
        }
      }
    }
  }
  return true;
}
As you might see, the code is pretty hacky. But, it works for me. Maybe, it also works for you, or it can be a starting point.
We have projects working with WinForms GUIS. Different Developers work with different Computers, and these have different DPI settings. Every time the Project is opened on a system with different DPIs the WinForms get scaled, which is painfully bad.
Solution Summary
Set in your Forms Designer: Font = MS Sans; 11px
In the Forms Ctor, after InitializeComponent, set: Font = SystemFonts.DefaultFont
Enable DPI-Awareness, either through a manifest or by API function SetProcessDPIAwareness
Solution Details
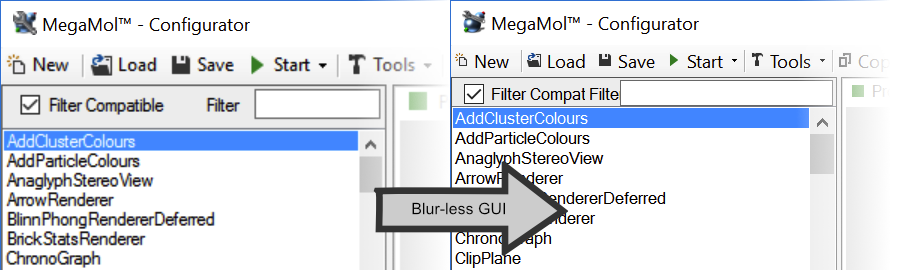
Make your WinForms GUI less blurry by being DPI aware
A modern Windows approach to High-DPI Displays
More and more Computers get equipped with High-DPI Displays, a trend I like very much. Pixels cannot be small enough. With modern Windows, however, GUI of older Applications get infamously blurry. This is due to Microsoft’s approach for backward-compatibility: applications will be rendered at their native DPI and scaled up to the system’s DPI. This way, the application does not need to know anything about DPI, but user controls will keep a decent size on any setting. While most people hate the blurriness of old GUIs on modern Windows, this approach does make a lot of sense:
Backward-Compatibility is instantly given, as nothing changes for the old Applications.
The users input experience is retained, as the GUI will keep its apparent size. (Just thing, if you’re old enough, of the original GUI of Winamp, where the buttons in the default skin were sometimes just a few Pixels in size.)
(last but not least) for new Applications, Developers hopefully get upset with the blurry look, that they actually invest some time, to do it right!
So, don’t claim it’s all Microsoft’s fault that the GUI of your applications look blurry. Truth is, you were just too lazy to do it right.
Why WinForms?
If you browse the internet in search for how to handle high-DPI settings with WinForms, you are bound to stumble upon a smart-ass telling you to switch to WPF. That person does have a point: WPF is designed to be a GUI for all resolutions. But, that person is also an idiot. Don’t bother discussing.
If you decided to use WinForms, then use WinForms. It is not deprecated, it is not legacy, it is not broken. There are good reasons to use WinForms. One, for example, would be the nice compatibility with Mono (Linux and MacOS). Another one would be compatibility with native GUI controls. Whatever your reason is, don’t let other people easily throw you off track.
If you’re not fixed on WinForms, but want to write a new Application for Windows, then have a look at WPF.
Why does Visual Studio Scale?
Normally Windows works at 96 DPI. That is, you need 96 pixels to fill up one inch of screen space. On a higher setting, let’s say 144 DPI, you need 144 pixels. So, either your GUI elements will look smaller, or your GUI elements must be larger to look the same. Modern graphical content is thus not described in pixels, but often in points (pt). Points are defined as 1/72 inch, that is in screen space, and not in pixels.
WinForms is not a modern GUI. All Elements are designed with pixels. However, higher DPI settings were present in Windows for a long time (accessibility feature). WinForms answers to this by having a mechanism to scale the whole GUI ‘manually’. If a scaling factor different from one is determined, all GUI elements, positions, sizes, etc., are multiplied by that factor, including the overall size of the window. By default, this scaling factor is determined comparing the Font settings of the form. Fonts are usually specified with a size in pt. Windows computes the font size in pixels based on the active DPI value. If WinForms now detects a mismatch between the pixel-based font sizes between design-time specifications and run-time evaluation, the form and all content is scaled. And this is exactly what happens in the Visual Studio Windows Forms designer.
Visual Studio does basically nothing at all. However, the font size evaluation is based on the system’s DPI setting. So on high-DPI systems, the font’s pixel size will be different from the stored design-time pixel size, and thus the whole form will be scaled accordingly. That is a good idea at run-time. I mean, that is the whole point of this mechanism. However, we are still at design time. The problem raises, because the Forms designer in Visual Studio actually runs the WinForms engine. As now all GUI elements change their sizes, the designer is informed (likely by the normal events) and adjusts all generated code to the new sizes and locations. This is, of course, ugly, painful and stupid, if you are going to continue the development on another machine with another, maybe, lower DPI setting.
Disable Scaling at Design-Time, Enable Scaling at Run-Time
What I am writing here is not a premium solution. It is the workaround I found for myself to work best.
The basic idea is to (manually) disable scaling at design time, and to (manually) enable scaling at run time.
I write scaling, but what we actually change is the Font!
Keep the Form’s AutoScaleMode = Font. That setting is correct and is not the problem at all. The problem is the automatically used font. It is the system’s default font, which specifies its size in pt. Again, a good idea at run time. What we change is the Font setting of the Form, to specify the size in pixels.
In the Designer, set the Font to: Microsoft Sans Serif; 11px
Windows default Font is Microsoft San Serif 8 pt. according to MSDN. Actually, it seems more like 8.25 pt. So this is 8.25/72 inch, which finally results in 8.25 * 96/72 = 11 pixel on a normal DPI system. That is why you set the font to this painfully small looking value. It is the right one! Now edit your GUI on all systems you have. Your Forms will not be scaled by Visual Studio any more. So, design time is fixed.
Now for the run time. That one is easy, too. All we need to do is to ‘reset’ the Form’s font to have its size specified in pt. again. The easiest way to do that is to reassign the system’s default font. Just set it in the constructor, right after InitializeComponent:
Font = SystemFonts.DefaultFont;
This, of course, only works if you are on a system where the system’s default font is as expected, and only if you do not change fonts for the controls inside your form. If you did change some control’s font, you specify the font with pixel size for design time and you update these at run time initialization to use pt.-based sizes again.
Scalable GUI Design
And that is that. If your application is already DPI aware, your forms will now scale nicely. That is, if you designed them correctly.
You should not mix docking-based and anchor-based design in the same form. That is bound to produce weird scaling issues.
You must use either, otherwise the controls will just randomly shift somewhere.
Be aware that the control might no longer fit into your Form, due to the maximum window size. Use flowing layout containers and auto scrollbars.
Enable DPI Awareness
All that, of course, only makes any sense if you enable DPI awareness for your application. There are basically two options:
Maybe, you know, that modern Windows can be even more complicated by per-monitor DPI settings. The idea is, that attached external screens have different sizes and resolutions, and should thus be handled with different DPIs. The good news is: this approach here works instantly with per-monitor DPI. When the form is dragged onto another monitor, the system automatically adjusts the font setting, as the font size is at run time specified in points. This automatically triggers a rescaling of the form. Wheee!
Simple computer graphics demos are often developed as console applications. Having the console window is simply convenient for debug output. However, if we then show these demos on our stereo powerwall, the console window flashing on program start is massively disturbing. That is why I take some time and wrote a little tool. It starts the console application, hides the console window, but captures the output. This way, we can still check what happened if something does not work.
I present the HiddenConsole:
HiddenConsole.zipApplication starter hiding the console window [55.3 KB; MD5: 848cbd8aa901fe38be8179d65b6d2162; More Info]
And, because I can, the source is freely available:
Most new data sets for my scientific visualization find their way to my desk in form of arbitrarily structures text files. This is not really a problem. The first sensible step is converting them into a fast binary format for the visual analysis. With this, however, I face the problem of understanding the structure of 11 Gigabytes text files (no exaggeration here!). But, such files do have structure. So, only the few first and few last lines really matter. The bits in-between will be roughly the same way. What I need are the Linux-known commands “head” and “tail”. However, I am a Windows guy. So? The Powershell comes to the rescue:
Today I am presenting another small tool of mine: the ShutdownPlannerGUI
ShutdownPlannerGUI.zipSimple GUI for planned Shutdowns of MS Windows [188 KB; MD5: 45cb64eef13ea47e98a7dcde0773e6f1; More Info]
The basic idea is simple: it is a small GUI, slapped together in C#, around the Shutdown command-line utility. It is about the timer, specifying when the system is going to shut down. The GUI provides several text boxes to conveniently enter the time in hours, minutes and seconds. And that is it.
This website uses cookies to improve your experience while you navigate through the website. Out of these cookies, the cookies that are categorized as necessary are stored on your browser as they are essential for the working of basic functionalities of the website. We also use third-party cookies that help us analyze and understand how you use this website. These cookies will be stored in your browser only with your consent. You also have the option to opt-out of these cookies. But opting out of some of these cookies may have an effect on your browsing experience.
Necessary cookies are absolutely essential for the website to function properly. This category only includes cookies that ensures basic functionalities and security features of the website. These cookies do not store any personal information.
Functional cookies help to perform certain functionalities like sharing the content of the website on social media platforms, collect feedbacks, and other third-party features.
Performance cookies are used to understand and analyze the key performance indexes of the website which helps in delivering a better user experience for the visitors.
Analytical cookies are used to understand how visitors interact with the website. These cookies help provide information on metrics the number of visitors, bounce rate, traffic source, etc.
Advertisement cookies are used to provide visitors with relevant ads and marketing campaigns. These cookies track visitors across websites and collect information to provide customized ads.
 I added another new tool to my Tiny Tools Collection: ToggleDisplay

 Yes, I am still using
  As can be read on the internet: HtmlAgilityPack is not for beautiful, aka human readable, html files.